tisdag 24 maj 2016

MPM Wellington Mk.II - Part II

As the low frequency of my posts may indicate, there isn't much time for me to keep this blog in a format I've initially intended. My intention was to 'document' the progress of my builds in detail, with frequent posts and a lot of pictures. Unfortunately, I simply don't have time for that at the moment. I have therefore made the decision that for the time being, I will post two posts for each kit I build - one with my initial impressions and one with a presentation of the final build.

And here we go... the final presentation of MPM's Vickers Wellington II in 1/72 scale. In retrospect, not the best kit I've worked with. It's a short production kit and one has to struggle with it all the way to the end. The area that caused me a lot of problems were the windows and cockpit. The fit of those parts is initially very bad and I didn't spend enough time dry-fitting them. As a result, the quality of entire build has suffered. If you decide to build this kit, I recommend for you to ensure that clear parts do fit properly, it will save you a lot of trouble.

In other respects, it is relatively simple kit, maybe even a bit crude. But with a bit of TLC and if you squint just a little bit, it does look like a Wimpy. And that is enough for me.


torsdag 24 mars 2016

MPM Wellington Mk.II - Part I

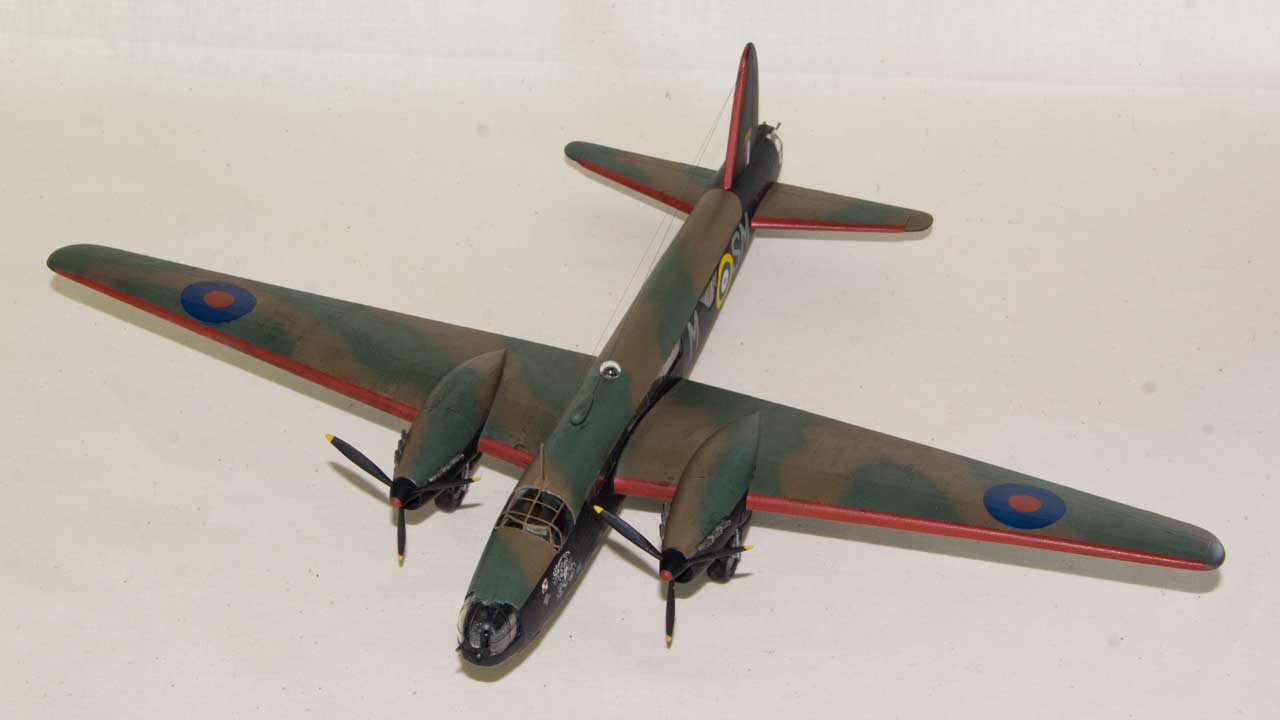
Once I was finished with my previous project, I've decided to pick up something a bit bigger, but not very challenging. MPM:s Wellington Mk.II seemed to fit the bill - large lumps of plastic, but not too many parts and seemingly easy kit to put together. As it turns out, trying to judge the amount of work that the kit will require based solely on a study of sprues and instructions manual can lead to some misleading assumptions.

But let's start from the beginning. An inspection of the sprues reveals that MPM:s version of Whimpy is indeed a pretty basic affair. As already said, number of parts is limited and interior detail is very sparse indeed - think Airfix and not Tamiya. However, the casting is top notch, there is pretty much no flash to be removed. On the other hand a number of sink marks needs dealing with, some of them in very inconvenient places (for example inbetween the aluminum ribbing on the inner side of the fuselage). However, the major challenge in the preparatory phase of the project consists of the fact that MPM didn't bother with making holes for the romboid windows in fuselage sides. I'm pretty sure there is a good reason for it, but I didn't appreciate having to this task on my own, mainly due to the fact that certain precision is required so that the window frames fit properly. Needless to say, I messed up with this task, the jury is still out on how badly. In any case,  this job in itself moves this kit to 'intermidiate skill level' in my opinion.

'Must be done before moving on'-challenges don't end there. Wellington's fuselage has several transparent windows, two of which stretch pretty much through enitire middle section. Those windows need to be fitted in place before you can close the fuselage. The fit is 'so so', but with a bit of dry fitting and delicate work with sanding sticks, it can be done without much fuss. Masking of transparent parts is perhaps a bit more challenging task. Here I believe I found the optimal solution - I masked both sides of window frames before installing them in the fuselage.

Interior of MPM:s Wimpy is rudimentary. Pretty basic cockpit and instrument panel with decent detail but no decals, The geodetic aluminium ribbing that is the characteristic feature of Wellington is sculpted directly on fuselage flanks.

MPM:s preferred paint manufacturer is apparently Gunze Sangyo and all color references refer to paint codes of that company. Since I don't use Gunze Sangyo, I had to shoot from the hip and used approximations based on what I already had home. And so MPM:s recommendation for cockpit interior ("Grey Green") became Vallejo Model Color 979 (German Cammo Dark Green). I know, probably completely wrong shade of green, but to be honest, since cockpit interior will look black' anyway, I am not very concerned by that fact. Canvas walls of the fuselage in Wellingtons were painted with special primer paint which apparently was of the color of red brick. Here, I went with Tamiya's Flat Brown lightened up with couple of drops of White. It came out probably a bit to dark, but yet again, the interior will be very dark, so I'm not very concerned. And yes, for the same reasons, I've decided not to bother with painting the aluminium ribbings on the sides of the fuselage - it would take hours to do it properly and the effort would in the end be pretty much invisible. So why bother?

Another construction step that needs to be completed before fuselage can be closed is putting together of the forward and aft turrets. This is perhaps the most patience-testing task when it comes to this kit. Instruction manual is extremly unhelpful regarding construction of gun decks themselves. Make sure you place guns in correct position on the mounts! Also, turret cannopies must be some of the most frustrating assembles I've ever encountered - four, small, fiddly transparent sections need to be put together pretty much perfectly. As can be seen in the picture below, one of my 'finished' cannopies was less than perfectly alligned even after all of my efforts (now corrected).

And here we are - the interior is pretty much done. I still have to paint the gun turrets and once this is done, I can close the fuselage and move on to the assembly of the airplane itself.


Fuselage interior. The romb-shaped openings for rear windows
have to be cut out manually.


Cockpit interior painted with Vallejo Color 979. To give a bit of depth I painted Vallejo Black wash, followed by a highlight of a mix of base color and white. The wash left a very unattractive shiny spots, I hope I'll be able to fix it with a coat of flat acrylic varnish.


Front office.


Turret cannopies. The one to the right isn't alligned properly, it has now been corrected.

lördag 19 december 2015

Airfix Messerschmitt Bf 109E-7/Trop - Part I (finished build)

Well, it's been rather quiet here for a while, as real life has once again made an unwelcome imprint on my leasure time. Nevertheless, somehow I managed to crank out yet another kit during October. This time around it was another simple kit from Airfix, their 1/72 scale Messerschmitt Bf 109E-7/Trop.

It is a delightful little build, quite easy to put together, but still very satisfactory detail-wise. There really isn't very much to tell about the build process itself - you simply put it together, paint it and you're done. One minor quible could be that the armoured plate for the pilot is very difficult to glue in place without blemishing the clear cockpit cover, but that's really pushing it. I'll leave it to 'rivet counters' to find all the faults with this model, personally I just love it.

The fact that Airfix provides decals for two paint options - one for a Luftwaffe plane deployed in Africa, the other for Royal Bulgarian Airforce (kudos for the unusual subject selection!) only makes things better. Full set of stencils is also included and everything is made by Cartographer, ensuring that the decals are top quality. For around 110SEK, things don't get better than this!

The build process with this one is so drama-free that there really isn't much point in writing anything about build process. Couple of words need however be written about the paint job. Once build, the kit was primed with PlastiKote Grey Primer. I found it in Slöjddetaljer shop (Sweden) and can recommend it for those who can find it - a very nice alternative to Vallejo Grey primer I usually use in my projects, at about half the price per can. Basic paint job was done with Lifecolor acrylics. Usual 'German' suspects were used - UA503 Hellblau for lower surfaces, UA505 Sandgelb II for upper surfaces and UA502 Dunkelgrün for mottle camo spots. Yes, I'm aware that RLM80 should have been more correct choice, mea culpa. :)

After usual post-processing with varnishes to protect the decals, I played a bit with couple of common weathering techniques, with varied success. First I applied an overall coat of dark brown Flory Models, mainly to enhance the panel lines. I'm still on the fence regarding this product, but in this case things worked out rather nicely. Once most of it was swiped away, the panel lines were very nicely lined out. Next I decided to experiment a little with oils - small dots of white, faded grey and brown were dotted irregulary all over the kit and thereafter 'worked into' the paint job with flat brush slightly damped with turpentine. Some folks can do very nice, subtle tone shifts with this technique. In this case my success was rather limited. Finally, I applied Humbrol smoke pigment around exhausts and gun barrels. With final coat of matte varnish applied, this step was mostly 'washed away' - I doubth I'll ever master pigments!

Anyway... the final result can be seen below. As already mentioned, I'm quite happy with this little kit especially since it's first time I applied freehand mottle camo with the airbrush.


onsdag 4 november 2015

C4 Open 2015 - Part II

Second and last part of pictures from 2015 C4 Open. This time around it's a mixed batch of airplanes, armour, dioramas, cars and miniatures. Hope you'll like them.


lördag 24 oktober 2015

C4 Open 2015 - Part I

Last weekend of October has arrived and that means one thing - it's time for another C4 Open exhibition. This year's event was as usual a lot of fun - there is a lot of talent out there and some of the kits made my jaw drop in wonder. At the same time, it was hard not to notice declining number of exhibitors. While airplane modelling appears to be as healthy as always, on military vechicle front only a fraction of models was on display when compared with last year. I never thought I'd say that, but I actually missed all those German 'big cats'. :-) On diorama front, things look even more dire - just a couple of relatively small displays, with none really standing out from the 'crowd'. In any case, here's the first installment of pictures - airplanes in 1/144, 1/72, 1/48 and 1/32 scales. Hope you'll enjoy them!

söndag 11 oktober 2015

Airfix Mitsubishi KI-46-II Dinah - Part II

Without further ado - here's the finished kit, in Air Defence of Japan livery (which by the way is a mistake to choose, as the extra armament of machines assigned to defense of home islands are not provided by Airfix).

Not much to tell about the final stages of construction or the paint job, except perhaps that I've chosen Tamiya XF-57 Buff acrylic paint for the overall beige color of the airframe. The choice wasn't based on any reference, but an assumption that Tamiya should have good insight into what colors were used by Japanese during WWII and XF-57 seems to come closest to the beige color specified by Airfix. Also, airbrushing with Tamiya acrylics is a blissful experience - you just paint and don't have to deal with all the hassle one always seems to have to wrestle with when using Humbrol and Lifecolor paints.

So here it is, hope you like it.


lördag 10 oktober 2015

Airfix Mitsubishi KI-46-II Dinah - Part I

If you're one of the few people in the world who visit this blog on regular basis, then you'd perhaps have noticed that for a brief time I've posted couple of posts about a Revell Boston build and that those posts were thereafter removed. The reason for this was quite simple - I botched the job and had to bin the kit. After that timewise rather costly fiasco, I wanted to build something basic and you can't go more basic than Mitsubishi KI-46-II from Airfix.

Airfix made this kit in early 60-ies and it shows. It really does. The kit is extremly simple, in some respects 'crude' comes to mind. Furthermore, time wasn't kind to the mould and there is a lot of small blemishes that look like small dust particle, but are actually tiny bits of plastic. Those need to be filed down or scrapped off. Wheels and propellers are very bad if one is to apply modern standards. Undercarriage legs are horrid, with lower shock absorbers being actually represented by filled in triangular pieces of plastic. Worst of all, one of the propeller blades in my kit was thinner than the rest and bent inward. I tried to warm up plastic under hot tap water and straighten it up, but with limited success. Panel lines are, of course,of raised variety.

Overall, it's a rather dismal kit and initally I considered keeping the transfers and binning the rest. Something stopped me though and I'm glad I didn't throw it away. Once I started to work on it, it started to grow on me. Yes, it is extremly simple and 'old style' and yes, many of the parts lack the finesse of more recent kits. But the main body - fuselage and wings - fit very well together and the subject itself is such a gracefull little machine that you can't help but start liking working on the kit.

Below are the pictures of sprues and completed airframe. At this stage I usually prime the kit and I didn't deviate from this routine with this kit. Strangest thing happened to me though - my trustworthy canned acrylic Vallejo grey primer produced this time around a rather horrid orange peel structure, clearly visible in last two pictures. I've been using this primer for years and never had an issue. Now this! I tried to sand the worst of it down, but with raised panel lines all over the place, there really wasn't much I could do to improve the situation.

If anyone can explain to me why a 'tried', vigorously shaken can of Vallejo acrylic primer, used on a sunny September morning, all of the sudden can 'get it into its head' to create an orange peel surface, I would really like to hear the explanation.