Last weekend of October has arrived and that means one thing - it's time for another C4 Open exhibition. This year's event was as usual a lot of fun - there is a lot of talent out there and some of the kits made my jaw drop in wonder. At the same time, it was hard not to notice declining number of exhibitors. While airplane modelling appears to be as healthy as always, on military vechicle front only a fraction of models was on display when compared with last year. I never thought I'd say that, but I actually missed all those German 'big cats'. :-) On diorama front, things look even more dire - just a couple of relatively small displays, with none really standing out from the 'crowd'.
In any case, here's the first installment of pictures - airplanes in 1/144, 1/72, 1/48 and 1/32 scales. Hope you'll enjoy them!
lördag 24 oktober 2015
söndag 11 oktober 2015
Airfix Mitsubishi KI-46-II Dinah - Part II
Without further ado - here's the finished kit, in Air Defence of Japan livery (which by the way is a mistake to choose, as the extra armament of machines assigned to defense of home islands are not provided by Airfix).
Not much to tell about the final stages of construction or the paint job, except perhaps that I've chosen Tamiya XF-57 Buff acrylic paint for the overall beige color of the airframe. The choice wasn't based on any reference, but an assumption that Tamiya should have good insight into what colors were used by Japanese during WWII and XF-57 seems to come closest to the beige color specified by Airfix. Also, airbrushing with Tamiya acrylics is a blissful experience - you just paint and don't have to deal with all the hassle one always seems to have to wrestle with when using Humbrol and Lifecolor paints.
So here it is, hope you like it.


lördag 10 oktober 2015
Airfix Mitsubishi KI-46-II Dinah - Part I
If you're one of the few people in the world who visit this blog on regular basis, then you'd perhaps have noticed that for a brief time I've posted couple of posts about a Revell Boston build and that those posts were thereafter removed. The reason for this was quite simple - I botched the job and had to bin the kit. After that timewise rather costly fiasco, I wanted to build something basic and you can't go more basic than Mitsubishi KI-46-II from Airfix.
Airfix made this kit in early 60-ies and it shows. It really does. The kit is extremly simple, in some respects 'crude' comes to mind. Furthermore, time wasn't kind to the mould and there is a lot of small blemishes that look like small dust particle, but are actually tiny bits of plastic. Those need to be filed down or scrapped off. Wheels and propellers are very bad if one is to apply modern standards. Undercarriage legs are horrid, with lower shock absorbers being actually represented by filled in triangular pieces of plastic. Worst of all, one of the propeller blades in my kit was thinner than the rest and bent inward. I tried to warm up plastic under hot tap water and straighten it up, but with limited success. Panel lines are, of course,of raised variety.
Overall, it's a rather dismal kit and initally I considered keeping the transfers and binning the rest. Something stopped me though and I'm glad I didn't throw it away. Once I started to work on it, it started to grow on me. Yes, it is extremly simple and 'old style' and yes, many of the parts lack the finesse of more recent kits. But the main body - fuselage and wings - fit very well together and the subject itself is such a gracefull little machine that you can't help but start liking working on the kit.
Below are the pictures of sprues and completed airframe. At this stage I usually prime the kit and I didn't deviate from this routine with this kit. Strangest thing happened to me though - my trustworthy canned acrylic Vallejo grey primer produced this time around a rather horrid orange peel structure, clearly visible in last two pictures. I've been using this primer for years and never had an issue. Now this! I tried to sand the worst of it down, but with raised panel lines all over the place, there really wasn't much I could do to improve the situation.
If anyone can explain to me why a 'tried', vigorously shaken can of Vallejo acrylic primer, used on a sunny September morning, all of the sudden can 'get it into its head' to create an orange peel surface, I would really like to hear the explanation.


lördag 18 juli 2015
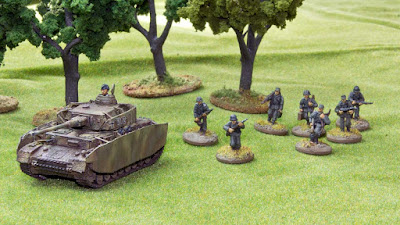
Milicast Panzerkampfwagen IVG
Another 'here's something different' for you - a resin 1/76 kit from Milicast, more precisely a Panzerkampfwagen IVG. A short background story is in place at this time. You see, all of my armour kits are really intended for a wargaming table and PzIV is of course a very 'common' vehicle. Unfortunately, when I once upon a time worked on that AFV (a Revell kit), I realized that its plastic shürtzeen mounts were too fragile for wargamer's clumsy fingers and would snap as soon as I put them on gaming table. The solution? Well, resin kits from companies like Milicast or MMS Models seemed to be the answer at that time.
Fastforward several years to today - I literally stumbled upon this kit while searching for something completely different and thought 'what the heck, let's have it done!'. Said and done, the end result can be seen below.
Now, working with 1/76 resin kits isn’t exactly the same thing as with their plastic 'brethren'. On one hand, you don't have to deal with putting the kit together, as kits from Milicast come basically in two cast parts - chassi and turret. Make no mistake though, we’re still talking about proper ‘models’ with finely detailed mouldning that rival anything Revell, Dragon or Italery has put out on the market in recent years!
PzIV's chassi has two fat moulding blocks attached to the tracks - those have to be removed. I cut them off with razor saw, damaging the tracks on the uderside in the process. Luckily, the damage is completely hidden, but care needs to be applied in this step. Also, there is a couple of small, resin parts that need to be cut out of their mould blocks and cleaned up, gun barrel being the most prominent.
Cleaning process is tedious, but necessary, especially in the case of this kit, where shürtzen are included in casts of chassi and turret - flash needs to be removed from all small gaps, nukes and crannies to make the model look respectable. This has to be stressed - you definitely need a respirator mask while sanding resin(!!!). Still, it really isn't very different than working with plastic as long as one remembers that resin is little bit more brittle.
At this point it is perhaps also worth mentioning that this particular kit is from Milicast's Battle Range, which is simplified for wargaming purposes and with fewer small parts than their Premiere range.
In case of this particular PzIV, the casting was mostly very clean if one disregards above-mentioned shürtzen mounts. The only exception was a nasty, solid blob of resin lodged between turret and one of front edges of turret shürtzen. Finally, after drilling a bunch of small holes and cutting and chipping away at it, I managed to get most of it out, but it was a real PITA.
Small resin parts can be either cut away with scalpel (gently) or sawed out with specialized tiny razor saws mounted on scalpel handles. Yes, it is additional hassle, but it’s worth the effort. The kit looks, at least in my opinion, really great with all its small details. Perhaps a bit softer that its plastic cousins, but on the other hand those shürtzen mounts won’t snap in two if you breath at them a little harder. Also, Milicast’s product range is simply bewildering, by far exceeding whatever is out there in plastics! If you, like me, is absolutely sick of yet another 'Tiger variant' releases from major plastic kit makers (Dragon, here's looking at you!), model ranges from likes of Milicast and MMS Models are pure heaven!
Paint job for this PzIV is a straight forward ‘German’ routine, based on 'artistic license' of yours truly, although the numbers suggest it's a kit from one of German SS regiments participating in Normandy campaign.
First, wash the kit was washed in warm soapy water. This is really necessary with resin kits where rests of mould release materials are always present and can make painter’s life a real hassle. Next, I used Vallejo grey primer as initial coat. Funny thing about resin and primers – this is the only one that seems to stick to resin, at least for me. Generic primers for plastics and primers just seem to pool together on resin when I use them.
Next, default German ‘war paint’ was applied. Orche from Tamiya, followed by German Olive Green from LifeColor and German Cammo Brown from Vallejo Model Color. All applied with an airbrush which, it has to be mentioned, was my Iwata Neo, which I managed to resurrect by getting replacement needle nozzle! It behaved quite admirably in this project, allowing me to paint the mottled cammo pattern without much fuss and acting very decently throughout the process. It seems that the trick to make it behave in such civilized manner is with help of Tamiya's alcohol-based thinner for acrylic paints. It seems to work wonders for both Lifecolor and Vallejo Model paints that have to be pushed through an airbrush.
Once the paint job was sealed with acrylic varnish, weathering process commenced, starting with an overall application of dark brown wash from MiG. Next, I ‘chipped’ the kit with Vallejo Panzer Grey and applied streaks with different products from Ammo. Finally, some pigments were added, before sealing everything with another coat of varnish. This of course resulted in pigments being virtually wiped out, but what can you do?
Overall, a quick, enjoyable little build!


onsdag 8 april 2015
Azur PZL.24 B/E - Part III
Happy to announce that the PZL.24 is finished. But let's start from the start. In my previous post the model was primed and ready to be painted. From three available liveries I choose the Romanian Airforce two-tone cammo variant, mainly because I already had the Humbrol paints recommended by Azur, but also because I wanted to do some freehand airbrushing.
The paint scheme was pretty much identical to that of early RAF airplanes - Humbrol Dark Earth (29) and Dark Green (30). Underside of the model was painted with Aircraft Blue (65). For details painted in yellow, I used Lifecolor UA140. With the exception of the 'Iwata incident' mentioned in previous post, the paint job went without major hickups. Masking the kit was a bit of a hassle and in hindsight I think it would be easier to paint the wing and fuselage before they're assembled.
Two coates of Vallejo Acrylic Gloss then went on top of the paint job and the kit was ready for decals. A bit of a warning is in place here - decals provided by Azur are extremly thin and very fragile. They adhere beautifully to the surface, but require a very gentle touch and a lot of water to keep them soft and pliable. Once the decals were in place, I dabbed them lightly with Microset just to help them settle in place.
Once another coat of Vallejo Acrylics was applied to protect the decals, I was at the final step - weathering. To be honest I was a bit lost at this stage - the panel engravings in this kit are shallow and not very well defined and I really don't have a clue about how to make duraluminum surfaces look realistic. So in the end I decided that less is more and limited myself to applying some powders and airbrushing Tamiya Smoke in few 'strategic' places. While doing that I also tried a technique I've read about in a couple of places - apparently Tamiya Smoke is used frequently to 'knock down' decals that are too bright and clean. So, I applied a couple of thin coats of it over the decals and I must say that I like the effect.
After application of matte varnish as a final step, the kit was done. What to say about it? I have a bit of mixed feelings about it. It's a short run production and it shows. The engine assembly and all the problems I had with fitting it inside its cover, the fact that correct positions of wing supports and wing itself have to be pretty much quessed by the builder, bunch of other ambivalences in instructions... all that leaves a lot of room for errors and quite a bit of frustration. However, despite it being far from trouble-free project and despite me making a lot of mistakes along the way, now that the model stands on my display shelf I must say that I am very happy with it. It is very unusual subject and it has this 'something' that attracts the eye.
torsdag 2 april 2015
Bye bye Iwata, I've hardly got to know you before you broke in two
Not a very happy camper at the moment - the fluid nozzle of my three months old Iwata Neo snapped in two as I was screwing it in place after rutine cleanup. I must admit that I was rather surprised and very sceptical the moment I saw that tiny little part. It looked very fragile and my suspicions were confirmed today; despite me being very careful every time I screwed it in place after a cleanup, it's thread gave up today. Part of the nozzle is now firmly screwed in place, the other part is snapped off, a failure which pretty much renders the whole airbrush permanently out of comission.


lördag 28 mars 2015
Azur PZL.24 B/E - Part II
Well, I'm pretty sure I'm getting the hang of the concept of 'short run kits' by now. In simple terms, there's nothing 'short' about them, except perhaps the short fuse one developes while working with them! Everything else is a never-ending battle.
Don't get me wrong, this is actually a very nice kit. The fit, if you use the term loosely is pretty decent and overall detail varies between subtle and acceptable. Multitude of photoetch and resin parts add that little extra, if you manage to stick them in place - many of the parts are so tiny that chances are about 50/50 you'll loose them to carpet monsters.
But then there are the frustrating parts... and there is a lot of them. First and foremost, instructions are pretty vague at a couple of critical steps, forcing one to guess the correct positions of parts. Engine sub-assembly is the one hit hardest by this problem. Its resin-cast piping section needs to be glued to the engine block - how far 'over' the cylinders it is glued will dictate how far from the fuselage the engine will 'stick out', which in turn will decide the position of engine cover. In other words, if this sub-assembly is messed up, the shape of fuselage will be 'out of wack'. Since I had to pretty much guess the right position of componens, I can only hope that the model will resemble the original.
Once the engine sub-assembly was guestimated together, it was time for another battle - a dry-fit showed immediately that there is no chance in hell that it would fit into its cover. The diameter of engine assembly is a good 3mm too large. I'm never a patient man when it comes to such issues and my solutions to them are usually crude and ugly. This time around was no different - I filed down the details of the engine and rasped out the inner sides of the cover until rough fit was achieved. Once I was done, the engine detail was completely butchered, but at least I can now stick the parts together.
Another critical assembly step that suffers from 'loose instructions' is how the wing is to be alligned with the fuselage. PZL 24's gullwing configuration is its most prominent feature, but it also presents a rather unique challenge for the model designers. In this case the solution is to fit the wing 'root' into rectangular hole in front of the cockpit. The fit between the parts is decent, but not crisp enough to know instinctively when the allignment is correct. In my case, I'm pretty sure that I managed to mess things in with this step, giving the kit a 'lopsided' appearance.
Just to add insult to injury, while wrestling with the problems listed above I've discovered that I was missing one of resin-cast radiators. The part broke off the moulding block and was nowhere to be found. Improvisation time - I cut off a rectangle of 2mm thich polyester sheet, glued it in place, softened it with plastic glue and did my best to enscribe the radiator ribs. The final result is nowhere near satisfactory, but it's either this or tossing the kit.
The chain of one challenge after another made the build process into far bigger challenge and something of a chore. In the end, it is a basic fighter and one should have to struggle so much with such simple kit. Still, once all the major assembly steps were finished and first coat of primer was in place, I have to say that the result isn't half bad after all.
Prenumerera på:
Inlägg (Atom)