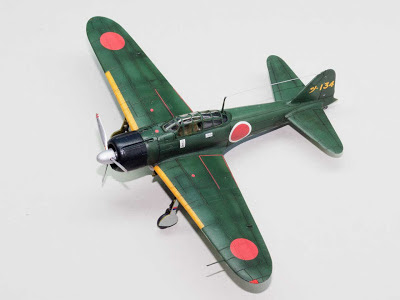
Final steps in this project were done 'by the book'. First, a gloss coat of acrylic gloss varnish sealed the paint job and prepared the model for decals. Then, decals (which by the way are excellent) were applied and allowed to set over the night. Second layer of gloss varnish sealed the decals and provided the smooth surface for washes and pigments.
After less than satisfactory experience with Flory Models' clay-based washes in previous build, I reverted back to water soluble oils as my 'weapon of choice' for washes and accents. One has to be a tad quicker when working with them, but for some reason I feel that I have better control with them. I prepared a thin wash of Burned Umber and Black and used it to outline all panel engravings. After allowing the wash to dry for a couple of hours, I cleaned up the excess wash with damp cotton wad. The fun thing about this technique is that the cleanup step also doubles as a subtle shading process - you just wipe the wash at the right angle from the panel engraving and leave a shade of discoloration on the airplane body. Instant filter, thank you very much.
Next, burnt umber and black pigments was applied very sparingly with a soft brush to all of the model. I tried to create subtle and irregular streaks of dirt and dust, concentrating on areas near the ground.
With pigments in place, the final step was to seal everything with two light coats of Testor's DullCoat. Usually, two coats are more than enough to bring down the model to 'dead matte' finish I like on my models. Not this time though. Maybe the weather was a bit damp or perhaps because the can was just about to be empty - for whatever the reason, after two coats of varnish, the model still has a slight satin shine. Funnily enough, it actually looked right on this model, so I let it be.
While waiting for the coats of varnish to cure, I started working on the cockpit. It quickly turned out to be the trickiest part of the entire build. Cockpit frame is very softly defined and just to make things a bit more trickier, many of the corners in Zero cockpit are rounded. Those two factors put together made cutting of the masks out of the tape pretty much impossible. Plan B was to use Vallejo's masking fluid instead. Problem is that I don't like that stuff and never had much success with it. Nevertheless, I decided to give it a try. Once the mask dried, I airbrushed the cockpit, first with the internal cockpit color, next with airplane color. Next day I tried to peal off the mask and it became almost immediately evident that I had no more luck with it than all those years ago when I struggled with similar product from Humbrol. I think I've managed to scrape of as much paint as mask and I was actually afraid that I now would have to scrap the entire cockpit. Luckily, acrylics are so very easy to wash of with plain water and detergent and I was able to save it.
In the end, I resorted to good old fashioned hand-painting with a brush and toothpick for cleanup of any mistakes. I came up with this technique while still in my teens, at the time when the only paint widely available for modelers in Sweden were Humbrol enamels. Scraping off enamels with a toothpick doesn't work that well, but guess what... it works like a charm with acrylics. Using brush to paint with Vallejo Air paints is on the other hand a real pain - they're so damn thin! Nonetheless, with a bit of patience I've actually ended up with acceptably painted cockpit.
End product of this project can be seen below. I've got to say say that I love this little kit and along with the Spitfire it has become an instant favorite of mine. Good job, Airfix!


Inga kommentarer:
Skicka en kommentar