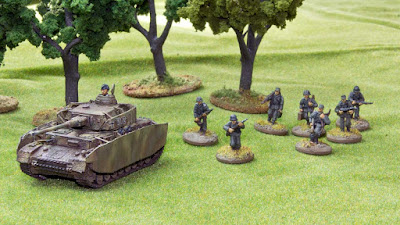
Another 'here's something different' for you - a resin 1/76 kit from Milicast, more precisely a Panzerkampfwagen IVG. A short background story is in place at this time. You see, all of my armour kits are really intended for a wargaming table and PzIV is of course a very 'common' vehicle. Unfortunately, when I once upon a time worked on that AFV (a Revell kit), I realized that its plastic shürtzeen mounts were too fragile for wargamer's clumsy fingers and would snap as soon as I put them on gaming table. The solution? Well, resin kits from companies like Milicast or MMS Models seemed to be the answer at that time.
Fastforward several years to today - I literally stumbled upon this kit while searching for something completely different and thought 'what the heck, let's have it done!'. Said and done, the end result can be seen below.
Now, working with 1/76 resin kits isn’t exactly the same thing as with their plastic 'brethren'. On one hand, you don't have to deal with putting the kit together, as kits from Milicast come basically in two cast parts - chassi and turret. Make no mistake though, we’re still talking
about proper ‘models’ with finely detailed mouldning that rival anything Revell, Dragon or Italery has put out on the market in recent years!
PzIV's chassi has two fat moulding blocks attached to the tracks - those have to be removed. I cut them off with razor saw, damaging the tracks on the uderside in the process. Luckily, the damage is completely hidden, but care needs to be applied in this step. Also, there is a couple of small, resin parts
that need to be cut out of their mould blocks and cleaned up, gun barrel being the most prominent.
Cleaning process is tedious, but necessary, especially in the case of this kit, where shürtzen are included in casts of chassi and turret - flash needs to be removed from all small gaps, nukes and crannies to make the model look respectable. This has to be stressed - you definitely need a respirator mask while sanding resin(!!!). Still, it really isn't very different than working with plastic as long as one remembers that resin is little bit more brittle.
At this point it is perhaps also worth mentioning that this particular kit is from Milicast's Battle Range, which is simplified for wargaming purposes and with fewer small parts than their Premiere range.
In case of this particular
PzIV, the casting was mostly very clean if one disregards above-mentioned shürtzen mounts. The only exception was a nasty, solid blob
of resin lodged between turret and one of front edges of turret shürtzen.
Finally, after drilling a bunch of small holes and cutting and chipping away at
it, I managed to get most of it out, but it was a real PITA.
Small resin parts can be either cut away with scalpel (gently) or sawed out
with specialized tiny razor saws mounted on scalpel handles. Yes, it is
additional hassle, but it’s worth the effort. The kit looks, at least in my
opinion, really great with all its small details. Perhaps a bit softer that its
plastic cousins, but on the other hand those shürtzen mounts won’t snap in two
if you breath at them a little harder. Also, Milicast’s product range is simply
bewildering, by far exceeding whatever is out there in plastics! If you, like me, is absolutely sick of yet another 'Tiger variant' releases from major plastic kit makers (Dragon, here's looking at you!), model ranges from likes of Milicast and MMS Models are pure heaven!
Paint job for this PzIV is a straight forward ‘German’ routine, based on 'artistic license' of yours truly, although the numbers suggest it's a kit from one of German SS regiments participating in Normandy campaign.
First,
wash the kit was washed in warm soapy water. This is really necessary
with resin kits where rests of mould release materials are always present and
can make painter’s life a real hassle. Next, I used Vallejo grey primer as
initial coat. Funny thing about resin and primers – this is the only one that
seems to stick to resin, at least for me. Generic primers for plastics and
primers just seem to pool together on resin when I use them.
Next, default German ‘war paint’ was applied. Orche from Tamiya, followed by
German Olive Green from LifeColor and German Cammo Brown from Vallejo Model
Color. All applied with an airbrush which, it has to be mentioned, was my Iwata Neo, which I managed to resurrect by getting replacement needle nozzle! It behaved quite admirably in this project, allowing me to paint the mottled cammo pattern without much fuss and acting very decently throughout the process. It seems that the trick to make it behave in such civilized manner is with help of Tamiya's alcohol-based thinner for acrylic paints. It seems to work wonders for both Lifecolor and Vallejo Model paints that have to be pushed through an airbrush.
Once the paint job was sealed with acrylic varnish, weathering process
commenced, starting with an overall application of dark brown wash from MiG.
Next, I ‘chipped’ the kit with Vallejo Panzer Grey and applied streaks with
different products from Ammo. Finally, some pigments were added, before sealing
everything with another coat of varnish. This of course resulted in pigments
being virtually wiped out, but what can you do?
Overall, a quick, enjoyable little build!


