torsdag 28 mars 2013

Airfix Messerschmitt Bf110C-2/C-4

My grand plan of making one model per month is falling apart, but Easter is just around the corner and that means couple of days away from work. In other words, it's time to move on to next icon of Battle of Britain - Messerschmitt 110.

After somewhat disappointing experience with Hurricane I, Airfix returns back to my favors with the new tooling of this classic twin-engined jack of all trades. At first glance, it looks to be an excellent model - considering the low price, detail of parts is excellent and panel lines are very crisp, although perhaps a bit too deep.

So far I have only finished the cockpit and put together the fuselage. Cockpit detail is, as expected, very rudimentary - floor, seats, partition wall between pilot and radio operator/rear gunner. Three rather oversized magazines for gunner's machine gun (one of which I managed to lose somewhere) provide a little detail for the floor. Instrument panel consists once again of a single decal. Very basic, but as can be seen in the pictures, not much of the interior will be seen once the fuselage is closed, so it's not much of a problem unless you choose to make it into one.

The fact that instrument panel plate doesn't fit into the fuselage is however a very real problem. Original form of that component makes it impossible to close the fuselage - there is at least 2mm gap. To rectify the problem, the instrument plate needs to be filed down a notch. In my case, it created another problem, because unaware of this needing to be done, I already put the instrument panel into place. Dry-fit and file this component before you stick the decal on to avoid this hassle.

Couple of words about the painting I've done so far. Pilot suits are my own interpretation, based on materials I have available. Airfix suggests that pilots wore bright blue-colored overalls, my own impression is that the crews also wore some sort of jacket on top of it. Pictures I found on the net and in my books suggest that black leather or dark tan-colored jackets similar to those worn by bomber boys were in favor among Me-110 crews, but don't take my word for it. My "historical research" is rudimentary at best and my usual approach when in doubt is 'if it's probable, it's good enough'.


Decals are of same fine quality as those in other new offerings
from Airfix. Complete set of stencil decals is included.


Three sprues of components out of the box.

Bomb armament and external fuel tanks won't be used by me
in this project, but they're a nice addition to my spare part box.


Putting together the fuselage turned out to be 
a bit of a hassle due to over-sized instrument panel plate.


If you're in a mood for a quick trip over the Channel, this cockpit
 provides a lot of room for a picnic box and a couple of bottles of wine.

söndag 24 mars 2013

Airfix Hawker Hurricane I - Part III

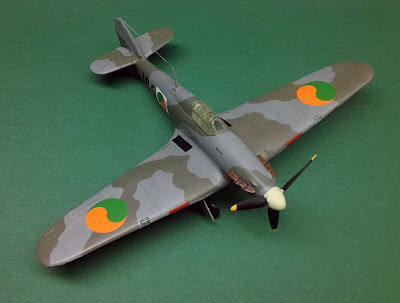
The Hurricane is done. My final verdict of this model is pretty much unchanged - it's an old model and something of a dog because of its age. On the positive side, it's cheap, simple to build and in my very uninformed opinion bears a decent resemblance of the subject matter. Also, the alternative decals for Irish Airforce (very nice to work with) gives a possibility to do something 'different' - those green-orange roundels and stripes do attract attention.

This time around I opted not to apply any weathering, for the simple reason that I don't think that such subtleties  contribute very much to a model with rised panel lines.


måndag 4 mars 2013

Airfix Hawker Hurricane I - Part II

Quick progress report on the Hurricane - dark green camouflage pattern (Humbrol 163 slightly lightened up with couple of drops of white) has now been applied. After frustrations with masking of the Spitfire, at first I tried to make life easier for me and gave the Blu-Tack a try. For those unfamiliar with Blu-Tack, it's a sticky mass used to... well, stick things together. The advantage of this material is that it isn't 'permanent' and can easily be removed from surfaces. At one time or other, some brilliant modeler  realized that this stuff could be rolled into a 'sausage', which in turn could be laid out on the model surface and used to demark camouflage lines. There is plenty of movies on Youtube demonstrating this technique, so take a look at it if it sounds like something you could use.

 In case of my Hurricane, I had however to go back to masking with transparent film. Don't know if it's the porosity of Humbrol acrylic paint or perhaps the formula of domestic variant of Blu-Tack is a bit different, but it turned out that when placed on the already painted upper surface of the model, the sticky mass 'sausages' left a light-greish discoloration that was almost impossible to remove or scrap away. I will definitely try this technique again in the future, but on this occasion it was a 'no-go'.

Once the masks were in place, some airbrushing did the rest of the job. Addition of dull green didn't make much to improve the appearance of the model, but it's at least now looking properly 'military'.